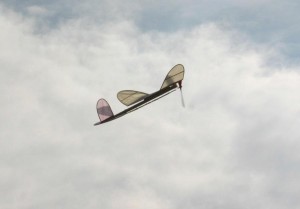
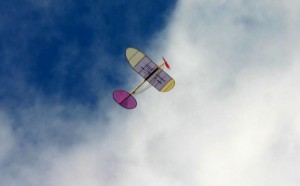
Photos by Bill Kuhl
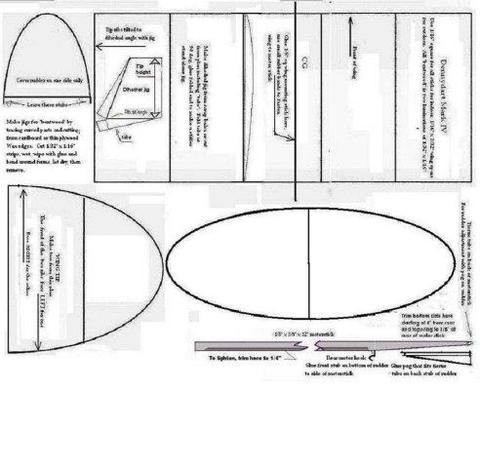
Plan and instructions by Neil Dennis.
The Denny Dart Mark IV is a balsa stick & tissue model airplane that is suitable for an advanced beginner. It is relatively easy to build but does require some advanced building techniques.It can be built either as an indoor (school gym)trainer or as an outdoor model to fly in calm conditions.
Instructions
Tools required:
Razor blade (single edge) or model knife
Several straight pins
A flat surface to work on that can be used as a pin board
A small piece of fine sandpaper
Materials required:
1/8 inch by 3/8 inch by 12 to 15 inch long balsa strip (1)
1/32 in x 1/16 in x 36 “A” grain medium weight balsa (2) or 3 if laminating ribs
1/16 in x 1/16 in by 36 in balsa strip (3) (indoor – should be light {6# or less)
Plastic propeller (6 in) and plastic bushing (from delta dart- outdoor, same or you can make a much lighter prop for indoor
10/12 in. loop of 3/32 in. rubber motor (outdoor)
15 in loop of 3/32 or smaller rubber motor (indoor)
2 very small (orthodontic) rubber bands – or bands may be cut from small rubber balloon
Tissue paper (outdoor) lightweight tissue or film (indoor) Balsa cement for building, carpenters wood glue for the laminated tip sections A glue stick to assemble sticks to paper
Copy of plan
Place the plan sheet, both for the wings and also for the fin and stabilizer on the building board and cover with plastic film or wax paper.
Make up templates to match the inside curves of the wingtip, stabilizer and fin, the easiest way to do this is to transfer the shape using carbon paper to heavy corrugated cardboard. Cut out the shapes, smooth and cover the edge with a strip of scotch tape, you can also wax the edge so the glue doesn’t stick. I also make a template of the wing rib, it can be used to slice ribs from sheet stock or to form the ribs by warping the wood (this is best method). The airfoil I use is a “Simplex 6%”.
To laminate the tip sections, cut two pieces of 1/32 x 1/16 stock to length, soak in hot water for about 10 minutes. Wipe the stick dry, lightly coat one surface on each stick with the carpenters (white) glue, place the two together with the glued surface inside and carefully wrap around the form, it’s a good idea to use a small strap (like a shoelace) on the outside of the sticks to support them as you wrap. Secure the ends with tape and let dry. Repeat for the other forms needed.
I “warp” my ribs by boiling the straight stick for about 5 minutes, clamping it to the form and “zapping” it in a microwave for about 4 minutes on medium heat – let cool before taking off form. Use 1/6 sq. A better way is to make up a formed sheet using a jig, (I saw one from a piece of hardwood – like 1 in x 1 in x 6 in – making both a top and bottom form by cutting on a band saw) then slicing the ribs from it, that way you can make them all at one time. You can also laminate the ribs same as the other formed parts from 2 sheets of 1/32″. If you do that, make the rib sheet the correct length by cutting and sanding so they fit to the spars, then stripping to width.
I would cut all the sticks to fit first, starting with the longest sticks on the wing. The best way I’ve found to make the stick to stick glue joints is to put several drops of the glue on an old plastic bottle top, then dip the end of the stick that is to be glued into the puddle. Carefully place the glued end against the other stick – do not leave any gaps. NOTE: do not glue the dihedral break points (marked x & y) at this time, build the tip sections as separate pieces to be assembled to the main wing section later.
If you don’t have any 1/8 x 3/8 balsa, you can make a substitute as follows. Using a 36″ length of 1/8″ sq, cut a 12″, 10″, and 8″ strip, laminate these together with the sticks even at one end by wiping glue on the edges and pinning them together. The staggered end is the tail, the tapered side is where the stabilizer mounts, that is the bottom side of the motor stick.
Cover the flying surfaces using whatever material you wish (tissue, or film). I use glue stick, wiping it on carefully and adhering the covering, note to cover top surface only of wing and one side of stabilizer and fin. I cover the wing tips before assembling to the main wing panel, then set the tips to the proper angle and glue securely. See below as an example.
To assemble the wing pin the 5 in. piece of 1/8 sq only at the very ends. Put a drop of glue on the under side of the wing spars at the marks and place the wing carefully lining up the marks with the center of the mounting stick. Pin down firmly making sure the wing is level. Using something that is about 1 1/2 in. tall under each wing tip to prop them up, put a drop of glue at each of the “x & y” joints and make sure they are pressed tightly together – Let this joint dry. Remove the pins, take up the wing assembly and carefully sand a taper on each end of the 1/8 square so that it comes to a sharp point.
To assemble the tail, put the stabilizer covered side down (sticks up) on the board, put some glue on the mating points and carefully put the tapered part of the motor stick down making sure that it contacts both front and rear of stab. Use something square, like a small clamp to hold the motor stick at 90 degrees to the stab and at the correct angle (the nose end will be up off the table about 1/2 in, that will make the stab come out in the right position when the glue drys, then glue the front of the rudder to the side of the stick, making sure that it is square and straight and that the rear sticks out 1/16″ behind the motorstick. This will allow you to make an adjustable rudder by following the directions on the plan.
Carefully sand the front of the motor stick until it is a snug fit inside the plastic propeller bearing, push a straight pin (it can be bent into a hook shape) into the bottom of the motor stick just in front of the stabilizer (rear motor hook). Put a drop of glue around this pin to strengthen the balsa, you may want to put a few wraps of thread around the stick there also. Assemble the propeller, hook motor between hooks and find balance point by resting stick on side of pencil and moving it back and forth until you find where it stays level. Mark an x on the motor stick at this point.
To assemble the model, take off the propeller ass’y, put the two small rubber bands on the stick, one just ahead of the rear peg, one just behind the propeller bushing. You may need to make each band into a double loop, this will hold the wing more solidly. Place the wing ass’y, the 1/8 sq flat on the top of the motor stick with the cg point in line with the x and slide the bands over the ends of the stick to hold the wing in place. Looking from the front, the wing and stabilizer should be parallel, if not, carefully sand the bottom of the wing mounting stick until they are.
Hook up the rubber band, lubricate it first with a little baby oil or silicon lube,(Son-of-a-gun works well),the model is ready to fly. Wind the propeller (clockwise from front) about 50 turns, hold the model at shoulder height and level, let go of prop and give a gentle push as you let go. The model should fly in a slight left turn and at a smooth angle. If it swoops up and then drops, move the wing back a little (only about 1/8), if it dives down move the wing forward the same amount. When it is flying smooth and level, keep increasing the turns wound in, you should be able to get up to 300 safely without breaking the rubber or if you stretch wind up to 1000 or better. To stretch wind, remove the motor from the rear pin, hook up to hook of winder and stretch the motor to about 3 times normal length, wind until it begins to feel “tight”, then move in slowly as you continue winding, then remove from winder hook and put on rear hook. As you put in more turns, if the model goes into a tight left turn carefully twist the plastic bushing so the propeller points slightly to the right, this will make the model climb in a more open spiral. If the circle is too large, put a tiny bit of clay on the right wing tip. If you do this you will have to move the wing forward a little to correct for the extra turn causing the model to nose down.
To fly indoors, you should use a thinner and longer rubber motor to keep the model from hitting the ceiling. Also, a suggestion for indoor is to add a small tab to rear of rudder and bend it so model circles left instead of right. You may need to adjust wing location and thrust line if you do this. With the right combination of motor and flight trim (adjustments) the model should just coast into a landing as the propeller stops turning.
Enjoy your model, if you want to build bigger and better models, many kits are available, but take a word of advice, do not try to build a scale model of a real airplane for your second try. Look for a beginners stick and tissue design.


Neil,
Would it be possible to get a plan for the Denny Dart Mark IV in some other format(PDF, DWG, DXF)? The one I download from above is not large enough to read and when I try to enlarge it the quality is to poor to read.
Thanx
Bill, your pictures are getting better everyday.